
How-to BBQ: Rack of lamb
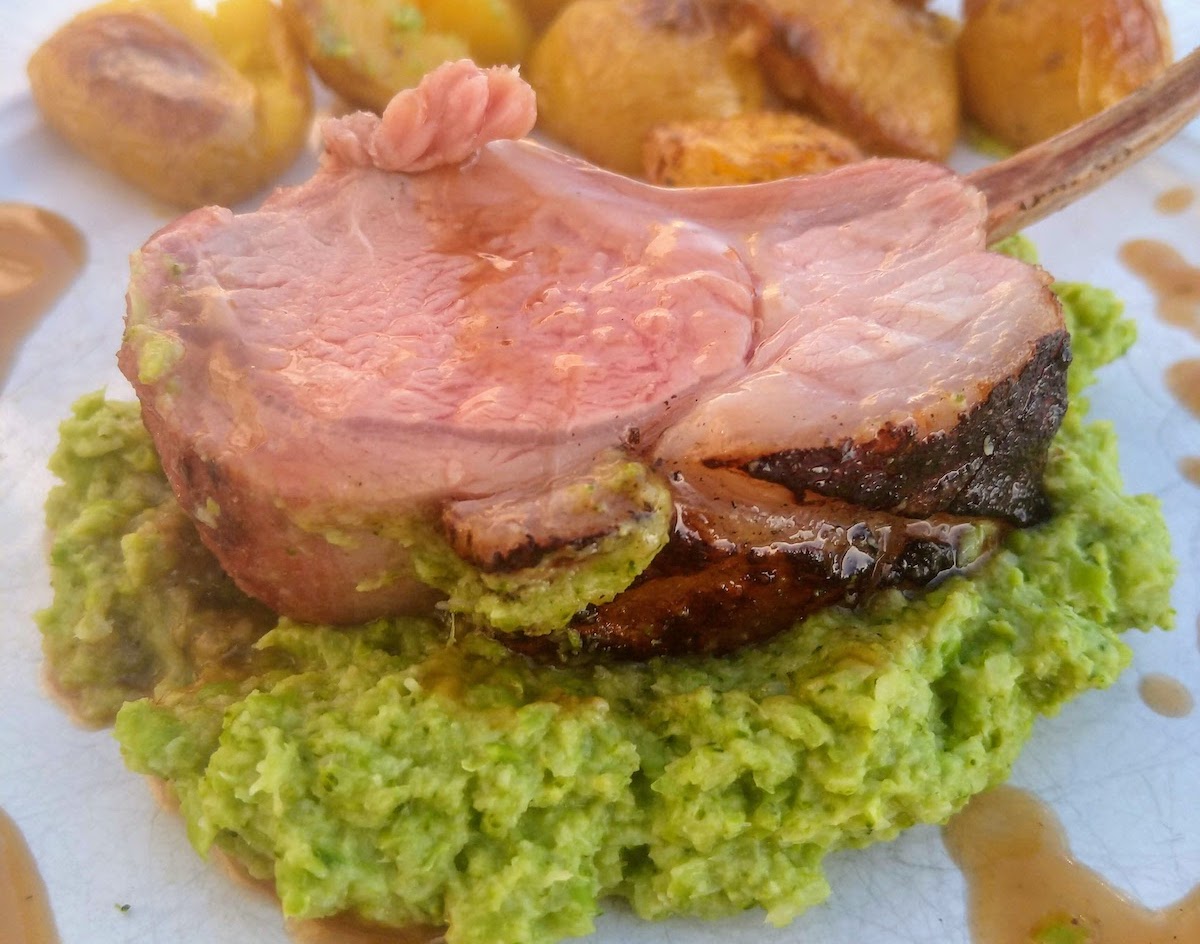
(dirty cooked salt-marsh lamb, on a bed of minted broccoli and pea puree served with crushed garlic baby gem potatoes)
A rack of lamb is a more expensive piece of meat than I usually cover here (at least cost by weight - will be far cheaper than a full brisket, but also far smaller). Normally favouring the cheaper tougher cuts for slow cooking, a good rack of lamb is pretty lean, soft and tender. Whilst this cut won’t need a long slow cook and won’t be falling apart like good pulled pork, we can still take advantage of the same cooking techniques to create amazing results on the BBQ.
I have done this cut a few different ways, in terms of flavours, but this recipe is for the simplest (and arguably the best) version, we will just season it and then cook it with fire, nothing else to it!
These techniques and recipe applies to pretty much any cooking device, you could follow this approach with an indoor fan oven if you wanted (replacing the dirty sear at the end with a heavy bottom pan to sear it). It will work easily with a bullet smoker like a Weber Smokey Mountain, a pellet grill like a Traeger or just a standard kettle grill.
However, my go to for a rack of lamb is always going to be my Kamado - If you have a Kamado Joe, Big Green Egg, Masterbuilt or any other Kamado, a piece like a rack of lamb is where a kamado grill really comes into its own. Unlike traditional low-and-slow BBQ joints, where we are looking to hit higher internal temperatures, a rack of lamb (much like a good steak, in my opinion) wants to be nicely medium-rare pink inside with a nice sear on the outside.
The edge-to-edge, evenly cooked internal is easily done low-and-slow on your grill, but the switch to a super hot cooking environment for the sear is where your Kamado will excel, whip out the divider, open up those vents and get the coals running hot and finish it up!
That all said, there is no reason you can’t use this technique on a bullet smoker, pellet grill or gas bbq - you just need any BBQ or oven where you can control the temperature to cook low-and-slow for a while before finishing with a hot sear. I have also cooked this sous-vide, doing the initial cook sous-vide and then searing on the hot coals (or cast iron pan on the hob).
The above photo I served it with broccoli puree, which is a common go-to for me - it’s just roughly but finely chopped broccoli, gently steamed in a few tablespoons of water (depending on amount of broccoli and size of the pan - we are aiming to have no liquid left after cooking, so not so much water we need to drain it later) and a knob of butter, once its cooked for five minutes or so, whilst it’s still a nice bright colour (and hopefully the liquid evaporated + absorbed) I blitz it with a handheld blender with another knob of butter and salted to taste. Another great combination is Moroccan style lamb + a minted pea puree (essentially cook peas, puree with fresh mint + butter).
1. How to buy a rack of lamb
As I mentioned, a rack of lamb can be quite pricey, and they aren’t a huge cut - a single rack could easily be a decent feed for two people, or if served with other stuff as a smaller meal, it could stretch to 4. You should obviously judge the size available when you buy it if you think you should buy two, some will be more meaty than others.
Racks of lamb are usually available from the meat counter at decent supermarkets, but as usual the best place to pick one up will be your local butcher. I’m lucky where I am, living in South Wales, we have excellent local lamb, so our butchers is always my go to for lamb (they also stock something called Salt Marsh Lamb which is lamb that grazes on the estuary salt marsh, feeding on plants grown there such as samphire etc) - luckily if you are in the UK, they also deliver nationwide.
High-end high street retailers and supermarkets will often offer racks of lamb, but often the price for the size of them is enough to make you want to cry, but it’s a great option for a nice treat or special meal, but just be prepared for a nerve wracking cook - the high price and more precise temperature required for medium-rare (compared to low-and-slow brisket where temperature is much more forgiving) makes it a little stressful!
2. Preparing rack of lamb for cooking
There really is very little to this part, all we will do is score the fat-cap on the top of the rack of lamb and then generously salt it. When I score it, I generally go for a diamond pattern (diagonal slices in one direction, then opposite diagonal slices to create a diamond pattern).
Even if I am doing a herb crusted rack of lamb, the initial prep stage is always the same. You can add other flavours, but it really doesn’t need it.
3. How to cook a rack of lamb
For the basic rack of lamb on the BBQ, I go for a standard Reverse Sear approach.
For a rack of lamb we will want it cooked gently and to a much lower internal temperature than our low-and-slow BBQ joints, so the goal here is to slowly bring it up to an even medium-rare internally, and then finish it off quickly with a high heat to sear the meat and render the fat.
If you have read my other article on low-and-slow BBQ, you will know the reason we cook the rack low-and-slow initially is to ensure a more even, edge-to-edge, internal temperature. For sure, its a small cut and you can easily get away with cooking it faster at a higher temperature, but I prefer the slightly slower approach - it doesn’t take too long and is so easy on the BBQ it makes sense.
For this, I’d definitely recommend an internal temperature probe for the meat, we want to be pretty precise with what’s happening inside the meat as it cooks. We’ll be looking to bring it off at a nice medium-rare temperature.
The final step is the sear - this is important so we get the beautiful deep reddish-brown crust on the meat, and a nice finish on the fat cap so its nicely rendered and not rubbery and chewy (just cooking the fat low-and-slow would almost certainly not render the fat, so you’d probably get a chewy, rubber like fat cap rather than a deliciously soft one).
The sear can be done in a couple of ways: dirty, on the grill above a direct heat or in a pan. If you want to sear in a pan, I’d pop a decent cast-iron skillet in the grill whilst you are cooking the rack low-and-slow to start pre-heating it, then once you have taken the lamb of, crank up the temperature to get the pan nice and hot (the oil should be starting to smoke) and sear the lamb.
However, my preference is to cook the lamb dirty (its easy, creates no washing up and is more fun). Once the rack of lamb hits the right internal temperature and you have taken it off the grill, open up the vents and crank the heat. Once the coals are nicely glowing red just put the lamb in, fat side down and sear. Things to note if you take this approach are
- Firstly, you are putting things in hot coals, this will be super hot (it should be!), so take real care. Wear protective gloves to handle the meat or tongs
- As this will be really hot, it will not take long and you will need to monitor it closely, moving it around to get an even sear all over. Leave this too long and you can easily over cook it!
3.1 But I want a herb-crusted rack of lamb!
Herb crusted racks of lamb make for great centre pieces, they look fancy and taste good (and thankfully are really easy), and we can follow a similar approach if we want to do that. I haven’t included a recipe for a herb crust, but they are really simple (I usually eyeball a couple handfuls of fresh mint, parsley, breadcrumbs and blitz them all in a food processor) and there are lots about on the internet, but the steps are as follows:
- First up, we will sear the meat - we still want it seared and the fat rendered, but we won’t be able to do that once we have added a herb crust (for hopefully obvious reasons), so we simply bring that forward as the first step
- Next up, apply the crust - I normally apply a layer of yellow mustard first to help bind the crust (and as always, don’t worry about not liking mustard, the flavour really doesn’t come through) and then apply the herb crust
- Finally cook low-and-slow on the BBQ until we reach the desired internal medium-rare temperature.
- 1 rack of lamb (2-4 people)
- 10 minutes
- 45 minutes
Ingredients
- 1 rack of lamb
Directions
- Cooking on hot coals can be dangerous, and should only be done if you are confident using a BBQ and live fire. Make sure you have appropriate protective wear and tools to avoid getting burnt, and take care!
- Start off prepping the lamb - simply score the fat cap and generously salt the lamb all over.
- Insert an internal temperature probe into the lamb and cook on the grill nice and low, about 110C/225F degrees. We are looking for a target temperature of around 50C (adjust if you have a particular preference for done-ness, but this works well for me). It shouldn't take more than 45 minutes.
- Once the lamb hits the internal temperature, take it off the grill and crank up the heat - open all the vents and get the coals nice and hot.
- Using a tool (and being careful not to burn yourself), gently rake the coals to knock any excess ash off.
- Place the rack of lamb fat side down in the hot coals, it will very quickly start to sear, monitor it closely, checking and turning if necessary every few seconds
- If you don't feel comfortable putting the meat direct into live coals, or don't have that available the sear can be done in a hot, heavy bottom frying pan (a cast iron skillet a good option if you have one) - even if not using the live fire, its important to still sear the lamb to properly render the fat so its nicely crisp on the outside and not chewy.
- Once seared all over, remove, slice and serve!
More delicious recipes
This is one of the many fantastic recipes available on this blog